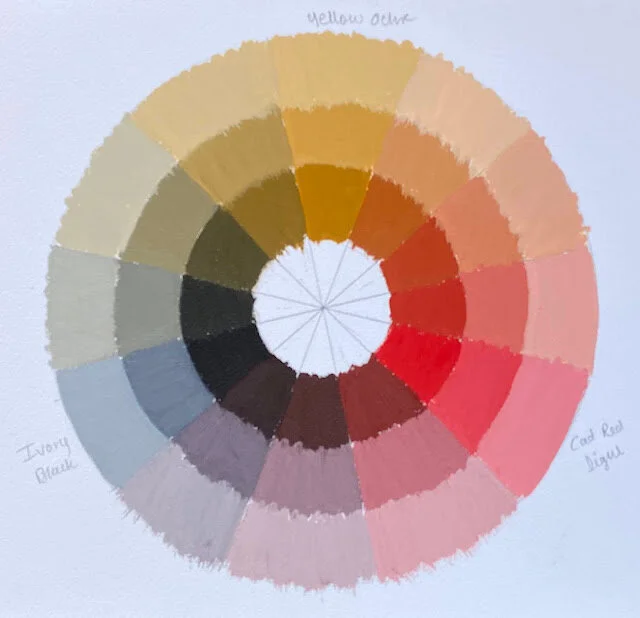
Zorn Palette Tutorial
Question: What is Zorn Palette?
Answer: The Zorn palette is a limited palette mixed with three colors of Yellow Ochre, Cadmium Red Light and Ivory Black (and Titanium White, that makes it 4 colors!!)
It is named after renowned Swedish artist Anders Zorn. Best know for his portraits, domestic scenes and nudes in outdoor settings.
Questions: Why Yellow Ochre, Cadmium Red Light and Ivory Black? (and of course Titanium White)?
Answer: They basically are a primary color set of Yellow, Red and Blue. They are the earth versions of the primaries. Cadmium Red Light is the most intense, rich and warm pigment on the palette. Whereas, Ivory black is the cool pigment and gives an impression of a deep blue. The earthy Yellow Ochre creates pleasing warm oranges with Cadmium Red as well as beautiful greens with Ivory Black. Titanium White is used for creating lighter values of these hues.
Question: Why Limited?
Answer: Although limited, this color palette provides tremendous tonal range in terms of color mixing. The subtle yet rich mixes of oranges, the striking olive greens and the beautiful toned down lavenders, can be used best for portraits as well as in still life and landscape painting.
Supplies for Zorn Palette Painting
Surface – options
(Size either 8x10”, or 9x12” or 11x14” or 12x16” or what is available to you!)
1. Canvas paper
2. or canvas board
3. or stretched canvas
4. or gesso Board
Paints – Oil paints or Acrylics or Gauche
1. Yellow Ochre
2. Cadmium Red Light
3. Ivory Black
4. Titanium White
5. Painting medium / Gamsol if you’re using oil paints
Drawing tools
1. Pencil or pen
2. Eraser (if needed)
3. Circle drawing tools or
4. Anything with a circle bottom such as mugs, round shaped objects
Palette – options are
1. Either Glass palette
2. or Wood palette
3. or Palette paper
Brushes – Your favorite!
(options – flats, filberts, synthetic, bristle (anything you like!)
Still Life Set-Up
1. Boxes or round objects such as vase mugs various colors such as Red, Yellow, Brown, Black, White
2. Shadowbox to set up the still life
3. Lamp to light the still life
Step 1 - Mix Your Zorn Palette
Mix Oranges
Squeeze out Yellow Ochre, Cadmium Red Light and Ivory Black on your palette (in a triangle) Yellow Ochre at the top, Cadmium Red Light and Ivory Black at the bottom corners
Squeeze out Titanium White on the side on your palette
Add Titanium White into Yellow Ochre for a lighter value, similarly add Titanium White to Cadmium Red Light and Ivory Black respectively for their lighter values
Mix Yellow and Red together for 3 variations of orange (a yellow orange, a mid-orange, a red orange)
Add Titanium White into these orange mixtures for two separate lighter values each
Mix Greens
Next, mix Black and Yellow together for 3 variations of Greens (a deep green, an olive green, a moss green)
Add Titanium White into these green mixtures for two separate lighter values each
Mix Purples
Red and Black together for 3 variations of purple (a deep red, a brown, a dark mauve)
Add Titanium White into these purple mixtures for two separate lighter values each
Make Your Color Wheel
Draw 4 concentric circles using either your circle drawing tools or the round bottom objects
Divide the circle into 12 equal parts, label the parts from 1,2,3,4,5,6,7,8 to 12 (1 at the top)
Fill in Yellow ochre into inner circle part 1,
Fill in the lighter values of Yellow Ochre in outer circles part 1
Fill in Cadmium Red Light into inner circle part 5,
Fill in the lighter values of Cadmium Red Light into outer circle part 5
Fill in Ivory Black into inner circle part 8,
Fill in the lighter values of Ivory Black into outer circle part 8
Next, begin filling the Oranges and their values in between Yellow Ochre and Cadmium Red Light
Fill in the Violets and Purples and their values in between Cadmium Red Light and ivory Black
Fill in the Greens and their values in between Ivory Black and Yellow Ochre
Setup Your Still Life
Set up simple still life objects such as boxes and/or round objects such as bowls, mugs etc.,
(Limit your objects to 2-3 for this exercise in order to gain an understanding of the color changes on fewer objects.
Adjust the lamp such a way that one side of the objects is in the light and the other one is in the shadows.
Begin Painting
Red Box - Color Decisions to make
Light plane on the red box
Shadow plane on the red box
top plane in the shadows on the red box
White Box - Color Decisions to make
Light plane on the white box
Shadow plane on the white box
top plane in the shadows on the white box
Table - Color Decisions to make
Light on the table
Shadows on the table
Background - Color Decisions to make
Light on the background
Shadows on the background
Follow the steps and let's paint!! I would love to see your paintings! Happy painting!
ASHWINI

